Atavism Custom Installation
Platform Recommendations/Requirements:
Preferred OS: Linux 64bit
Java: 8 (Atavism X.6-), Java 8 or 17 supported for Atavism X.7+
DB: MySQL 5 / MariaDB up to version 5.7 (or MariaDB equivalent), MySQL 8 supported for Atavism X.2+
Default Ports: 9005 TCP, 9010 UDP, 5042 TCP, 5052 UDP, 5566 TCP
Atavism 2.7: Unity 5.6 / 2017.1
Atavism 2018.1: Unity 5.6, 2017.x
Atavism 2018.2: Unity 5.6, 2017.x, 2018.1, 2018.2
Atavism 2018.3: Unity 5.6, 2017.x, 2018.x
Atavism 2019.1: Unity 2018.2, 2018.3, 2018.4, 2019.1
Atavism X: Unity 2018.4, 2019.1, 2019.2
Atavism X.1: Unity 2018.4, 2019.1, 2019.2, 2019.3, 2019.4
Atavism X.2: Unity 2018.4.2, 2019.1, 2019.2, 2019.3, 2019.4
Atavism X.3: Unity 2018.4.2, 2019.1, 2019.2, 2019.3, 2019.4
Atavism X.4: Unity 2019.4.0, 2020.1, 2020.2, 2020.3, 2021.1
Atavism X.5: Unity 2019.4.0, 2020.1, 2020.2, 2020.3, 2021.1
Atavism X.6: Unity 2019.4.0, 2020.1, 2020.2, 2020.3, 2021.1, 2021.2, 2021.3
Atavism X.7: Unity 2020.3, 2021.3
Atavism X.8: Unity 2020.3, 2021.3
Atavism X.9: Unity 2022.3
Getting Started
The following pages cover the steps needed to get the atavism server running and connecting to it using the atavism demo project.
Setting Up Server
The steps below cover how to set up the atavism server.
Install the free pre-requisites
MySQL
Java
Download and extract server folder/files
Download latest stable version of Atavism from https://apanel.atavismonline.com
Extract server part in the preferred location on your server (for example /opt/atavism/Atavism_version).
Source database files
Atavism comes with two types of installations, with and without demo data. By default scripts located in the “Server_location_files/sql/” are without Demo Data and in “Server_location_files/sql/New Install with Demo Data”. it’s up to you which version you want to install. For new Atavism users, we recommend using the version with Demo Data.
Import DB structure files to your DB engine (MySQL) there are 4 files located in “Server_location_files/sql/” or “Server_location_files/sql/New Install with Demo Data” depending on your choice. By default databases will be imported using the utf8 character set and utf8_general_ci collation.
- admin.sql
- atavism.sql
- master.sql
- world_content.sql
In command line type:
mysql -u -p <”filename.sql” – if local DB
mysql -u -h -p <”filename.sql” – if remote DB
Change database and server connection settings
There are 2 files that contain connection data which may need to be updated, these are all found in the bin folder.
- auth.properties
atavism.db_user=atavism
atavism.db_password=YourDatabasePassword
atavism.db_hostname=localhost
- world.properties (Atavism 2018.3.0-)
atavism.licence.email=youremail@email.com
atavism.licence.key=server-key
atavism.login.bindaddress= FQDN or public IP address
atavism.proxy.bindaddress= FQDN or public IP address
atavism.proxy.externaladdress= FQDN or public IP address (For Atavism 2018.3.1+)
atavism.db_user=atavism
atavism.db_password=YourDatabasePassword
Linux setup notes
Running the server in Linux may require a few additional steps. If your Linux server has yum capabilities you can run the following commands to get java and MySQL up and running (you will need to have admin/root permissions to run these):
sudo apt install openjdk-8-jre-headless
sudo apt install mysql-server #(version 5 – up to 5.7 or MariaDB equivalent). Since Atavism X.2 (10.2.0) MySQL 8 is supported.
Then to start the MySQL server type:
service mysqld start
You may also need to run a few commands, in particular, dos2unix and chmod. Here is what is recommended: Make your way to the server bin folder. Type:
- dos2unix auth.sh
- dos2unix auth.properties
- dos2unix world.sh
- dos2unix world.properties
- chmod +x auth.sh
- chmod +x world.sh
Note: If you are running on Ubuntu and having trouble starting the server you may need to change the top line in both auth.sh and world.sh to read: #!/bin/bash
Start the Server
With all the properties set the last this to do is run the server. Once in the bin folder type the command:
./auth.sh -vC start
To start the authentication server. Wait for a moment and the words “Starting authentication server: SUCCESS” will pop up. Note that it will not come up saying DONE INITIALIZING. Now start the world server by typing:
./world.sh -vC start
It will come up with the message “DONE INITIALIZING, you can log in now”. If you see that, you are good to go. Note that the first time you run the server it will print out lots of extra lines, so the message may be hard to find.
Stop the Server
To stop the world server type:
./world.sh -vC stop
To stop the auth server type:
./auth.sh -vC stop
Server Ports
To allow remote connections to the server the following ports need to be opened: * 5040-5060 * 5566 * 9005-9010
By default Ataivsm ports are as follows:
- 5042 – TCP – Realm Server Login Manager Service
- 5052 – UDP – Realm Server Proxy (whole game communication)
- 5566 – TCP – Realm Prefab Manager Server that sends templates definitions and icons
- 9005 – TCP – Authentication Server
- 9010 – UDP – Authentication Server
They should be opened for both UDP and TCP connections.
Setting up Unity to connect to the server
This is part of the Getting Started with Atavism section.
The steps below show how to get a project in Unity connecting to the server setup in the previous step: Setting up the Server
- Create a new project,
- Import atavism package,
- Load up Login scene,
- Set server connection details
To set the server connection details you need to select the AtavismCore object in the hierarchy and look for the Master Server property. Set it to whatever the address of the server is (if it is on the same machine you can use localhost).
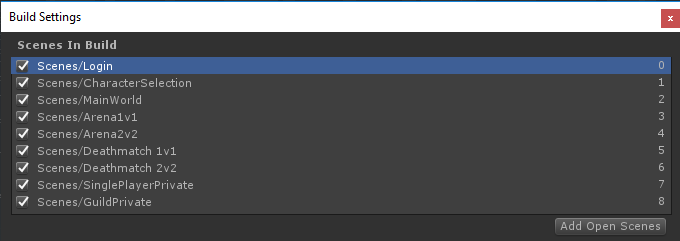
- Add scenes to the build settings
The Login, CharacterSelection, and MainWorld scenes need to be added to the build settings or you will have trouble entering the world. From Atavism 2018.1 more scenes presenting new features like Arenas or private instances were included in the project, so here is a screen presenting scenes you should put into the build window.
it is also recommended to refresh lighting and Asset Bundles because both are related to specific Unity versions. In order to rebuild your Asset Bundles (Bomber Bug is using them), you should head into the top menu in Unity Editor and chose Assets->Atavism Build AssetBundles (it will rebuild your asset bundles and then you should navigate to your project directory and copy file infinitypbr from project_directory\AssetBundles to project_directory\Assets\StreamingAssets.
Open the Login scene and select the AtavismCore game object.
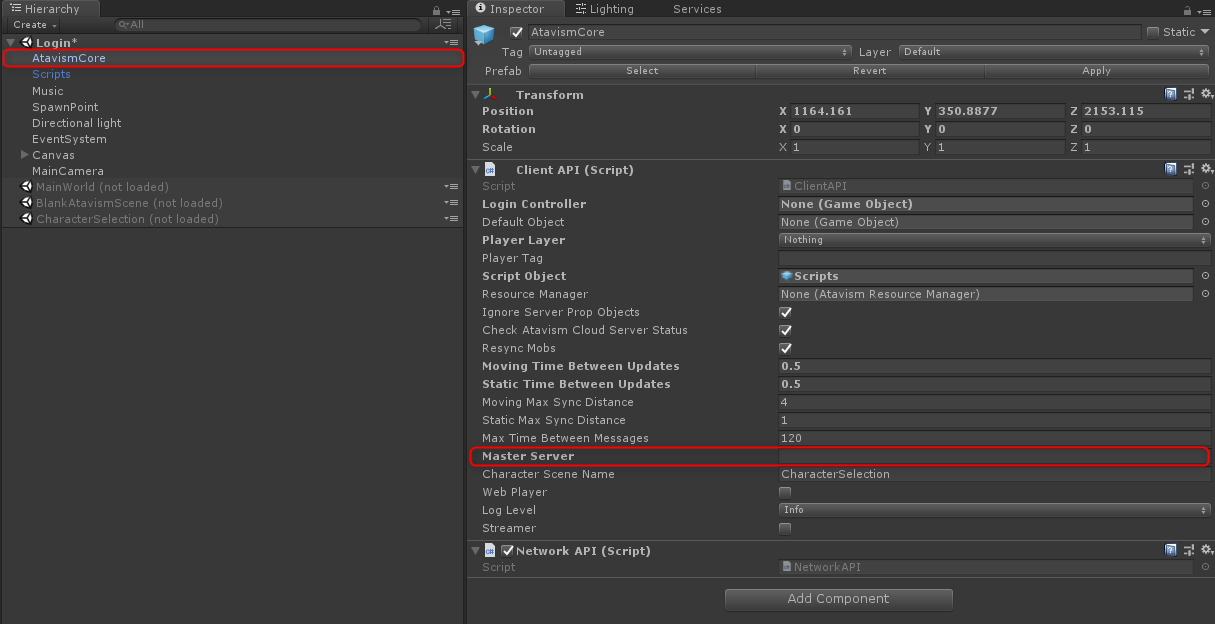
Put IP or FQDN to your Master Server parameter and save the scene.
Playing the demo
Your Unity project should now be ready to connect to your Atavism Server.
- Click Play,
- Click Create Account
Make an account for yourself. You will then be able to log in and create a character and enter the world! Enjoy your travels.
Ubuntu commands step by step
1. OS + Packages – Ubuntu Server 18.04
1.1. Create root password to enable root account (OPTIONAL)sudo passwd root
1.2. Updates
sudo apt update
sudo apt upgrade
1.3. Install additional tools (UNZIP, MC, HTOP)sudo apt install unzip mc htop -y
1.4. MySQL
– Install MySQLsudo apt install mysql-server
– Secure MySQL server:sudo mysql_secure_installation
– allow access from external IPsudo nano /etc/mysql/mysql.conf.d/mysqld.cnf
– Create New DB user, where atavism is a database username, which can be replaced by any name of your choicesudo mysql -u root -p
– create userCREATE USER 'atavism'@'%' IDENTIFIED BY 'YourDatabasePassword';
– Grant privilegesGRANT ALL PRIVILEGES ON *.* TO 'atavism'@'%';
– Quit from MySQLquit
– Fix MySQL 5.7+ issue with Dates (since Atavism 2018.2 this step is obsolete)SET SQL_MODE='ALLOW_INVALID_DATES';
1.5. OpenJDK-8sudo apt install openjdk-8-jre-headless
1.6A. VirtualBox Drivers (OPTIONAL) – only if you are uisng VirtualBox as a server emulation
sudo apt install -y dkms build-essential linux-headers-generic linux-headers-$(uname -r)
sudo mkdir /media/cdrom
sudo mount /dev/cdrom /media/cdrom
cd /media/cdrom
sudo ./VBoxLinuxAdditions.run
1.6B. VMware Drivers (OPTIONAL) only if you are uisng VMware as a server emulationsudo apt install open-vm-tools
1.7. Firewall (ufw version)
MySQL: sudo ufw allow from (SOME IP/ ip range) to any port 3306 proto tcp
If you want to allow full connection to your MySQL then invoke the commandsudo ufw allow 3306/tcp
Atavism ports:
sudo ufw allow 5040:5060/tcp
sudo ufw allow 5040:5060/udp
sudo ufw allow 5090
sudo ufw allow 9005:9010/tcp
sudo ufw allow 9005:9010/udp
sudo ufw allow 5566/tcp
SSH optional if you have access to VM console:sudo ufw allow 22/tcp
Enable firewall:sudo ufw enable
2. Upload Atavism Server files, using winscp
2.1. Unzip Atavism server file
unzip <file_name> – this command will extract atavism server files
2.2. Import SQL files to MySQL
cd /server files path/sql/New_Install_with_Demo_Data
Since Atavism 2018.2 sql files are in separate directories, for core version:
atavism_server/sql/New_Install_Core/
and for the version with demo data
atavism_server/sql/New_Install_with_Demo_Data/
mysql -u atavism -p < admin.sql
mysql -u atavism -p < atavism.sql
mysql -u atavism -p < master.sql
mysql -u atavism -p < world_content.sql
2.3. Modify 2 server properties files (world.properties and auth.properties)
cd /atavism_server_files_path/bin/mcedit auth.properties
F2 will save the file, ESC will exit editor
auth.properties
atavism.socketpolicy.bindaddress = FQDN or public IP address
atavism.db_user=atavism
atavism.db_password=YourDatabasePassword
mcedit world.properties
F2 will save the file, ESC will exit editor
world.properties (Atavism 2018.3.0-)
atavism.licence.email=youremail@email.com
atavism.licence.key=server-key
atavism.login.bindaddress= FQDN or public IP address
atavism.proxy.bindaddress= FQDN or public IP address
atavism.proxy.externaladdress= FQDN or public IP address (For Atavism 2018.3.1+)
atavism.db_user=atavism
atavism.db_password=YourDatabasePassword
world.properties (Atavism 2018.3.1+)
atavism.licence.email=youremail@email.com
atavism.licence.key=server-key
atavism.login.bindaddress= FQDN or server IP address
atavism.proxy.bindaddress= FQDN or server IP address
atavism.proxy.externaladdress= FQDN or public IP address
atavism.db_user=atavism
atavism.db_password=YourDatabasePassword
2.4. Start servers:
cd /atavism_server_files_path/bin/
sudo ./auth.sh -vC start
sudo ./world.sh -vC start
3. Create UNITY project:
– Import Atavism package to unity
– Configure Atavism DB connection
– Setup scenes
– In login scene -> Atavism Core -> enter details for master server.