Instance Objects Plugin
Atavism 10.4.0+

In this plugin you can manage your scene objects (save or delete and set grid size for them) like:
- Interactive Objects: objects with which players will interact with, like portals, apply effects, leave an instance, etc.
- Regions: where you can automatically apply an effect or do any other action when a player will enter the region
- Graveyards: where you can set respawn location instead of normal teleport and spawn location mode
- Claims: designed for building purpose
Manage Interactive Objects
Interactive Objects are set up in the Unity Editor then saved to the Content Database with the Atavism Editor.
Creating Interactive Objects
Interactive Objects are GameObjects that exist in a Unity Scene. Place your Game Object in the scene and add an Interactive Object component.
You can set the properties as follows:
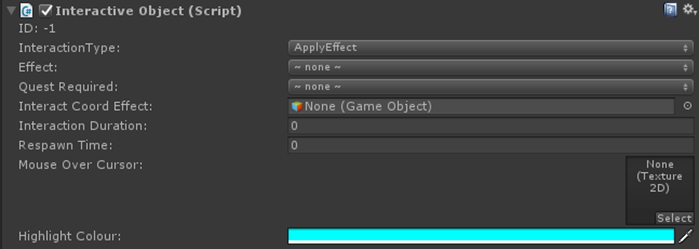
- Interaction Type: defines a type of interaction:
- Apply Effect: you can define Effect which will be applied once Interactive Object will be activated. Such an effect can be defined in Effect Plugin.
- Play Cord Effect: you can define Coordinated Effect which will be played one after another once Interactive Object will be activated. Such coordinated effect can be defined in Coordinate Effects Plugin (you don’t have to create a new entry in Atavism Editor, all you have to do is provide Coordinated Effect object which you should create in /Assets/Resources/Content/CoordinatedEffects directory in your project. On that Coordinated Effect, you should have only Coord Animation Component where you can attach animation, particles or sound with some additional parameters.

More options are described in detail in the Coordinated Effects Plugin. It can be used for example for doors when you will close and open them by interacting with them. Coordinated Effect, in this case, should play the animation (open / close) - Start Quest: start quest which can be defined in Quests Plugin
- Complete Task: complete task which can be defined in Task Plugin
- Instance Portal: defines teleport to the instance with:
- Instance: instance from the dropdown list defined in Instance Plugin
- Position: world position where the player will be teleported in specific Instance
- Min. Level – Max. Level: level range for which that Instance Teleport will be available to, if the player won’t have the level in that range then he won’t be able to enter the instance
- PvP: not available yet
- Sanctuary: not available yet
- Leave Instance: leave instance to the previous one
- Quest Required: defines quest which player must have started to interact with that Interactive Object
- Interact Coord Effect: it’s Coordinated Effect which will be played while interacting with Interactive Object
- Interaction Duration: time of interaction with Interactive Object
- Respawn Time: delay between Interactive Object can be used
- Mouse Over Cursor: defines cursor while hovering over Interactive Object
- Highlight Colour: defines color which will be applied while hovering over Interactive Object
You can add as many Interactive Objects as you want to your scene.
Saving Interactive Objects to the database
When you have your Interactive Object added to your scene, open the Atavism Editor and go to the Instance Objects Plugin. Click on Manage Interactive Objects then Save Interactive Objects and wait for the “Nodes Saved” message. Now save your scene again as the Interactive Objects would have been given an id by the database.
Restart your server and go forth interacting with those Interactive Objects.
Manage Regions
Regions are set up in the Unity Editor then saved to the Content Database with the Atavism Editor.
Creating the Regions
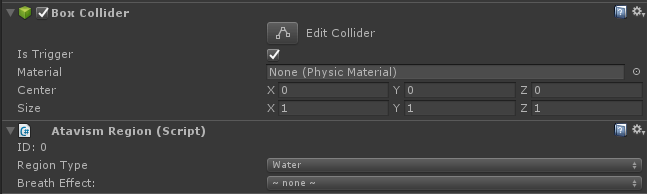
Regions are GameObjects with colliders that exist in a Unity Scene. Place your Game Object in the scene and add an Atavism Region component. The important thing is to not scale objects but collider only like cube directly on Box Collider Component. Also Collider Component has to have Is Trigger checkbox ticked.
You can set the properties as follows:
- Region Type:
- Water – where gravity won’t be applied and effect can also be applied like lowering oxygen and when it hits min oxygen value another effect can be applied like taking damage which will be applied for each tick.
- Dismount – dismount when entering the region
- Teleport – teleport to the location of x,y,z in the same or another instance
- Apply Effect – apply the effect which is defined in Effects Plugin
- Start Quest – start a quest which is defined in Quests Plugin
- Complete Task – complete task for the quest objective
- PvP – change players faction to PvP
- Sanctuary – change players faction to non-PvP. Must be located within the PvP region.
You can add as many Regions as you want to your scene.
Saving Regions to the database
When you have your Regions added to your scene, open the Atavism Editor and go to the Instance Objects Plugin. Click on Manage Regions then Save Regions and wait for the “Nodes Saved” message. Now save your scene again as the Regions would have been given an id by the database.
Restart your server and go forth interacting with those Regions.
Manage Graveyards
Graveyards are set up in the Unity Editor then saved to the Content Database with the Atavism Editor.
Creating the Graveyards
Graveyards are GameObjects with colliders that exist in a Unity Scene. Place your Game Object in the scene and add an Atavism Graveyard component.
You can set the Faction requirement for each Graveyard point, so each Faction which is defined in Factions Plugin can have its own Graveyard Spawn Points.
You can add as many Graveyard Points as you want to your scene.
Saving Graveyards to the database
When you have your Graveyards added to your scene, open the Atavism Editor and go to the Instance Objects Plugin. Click on Manage Graveyards then Save Graveyards and wait for the “Nodes Saved” message. Now save your scene again as the Graveyards would have been given an id by the database.
Restart your server.
Graveyards work like spawn points, so if the player will die, then he can release, and then he will be released in the nearest graveyard spawn point location with matched faction requirement.
In order to use that functionality instead of static default spawn point system, you have to have set parameter USE_PLAYER_SET_RESPAWN_LOCATIONS to false in Game Setting Plugin.
Also, the player can use spirit form option instead of release on death, in this case, you can choose effect which will be applied in spirit form by setting parameter SPIRIT_EFFECT to the id of the Effect. The parameter can be defined in the Game Setting Plugin while Effect can be defined in Effects Plugin. While the player is in spirit form he can be revived by Revive Effect which can be applied to him by another player, Region or Interactive Object.
Manage Claims
Claims
Claims are areas of the world that players ‘lay claim to’ allowing them to build in the area. Players may buy and sell claims and place objects freely within their claim and any other claims they have been given permission to build in.
Players can view the claims in the world by opening up the World Builder UI from the rightmost button in the toolbar menu located at the top right of the screen. When they enter a claim they will be shown a UI that gives them options based on their permissions for that claim.
Setting up Claims
Claims can be added to the world in two ways.
- They can be spawned by admin players from the World Builder UI.
- Items with a ‘CreateClaim‘ effect can be used. Make sure the size field is filled in. It is in meters.
Example:
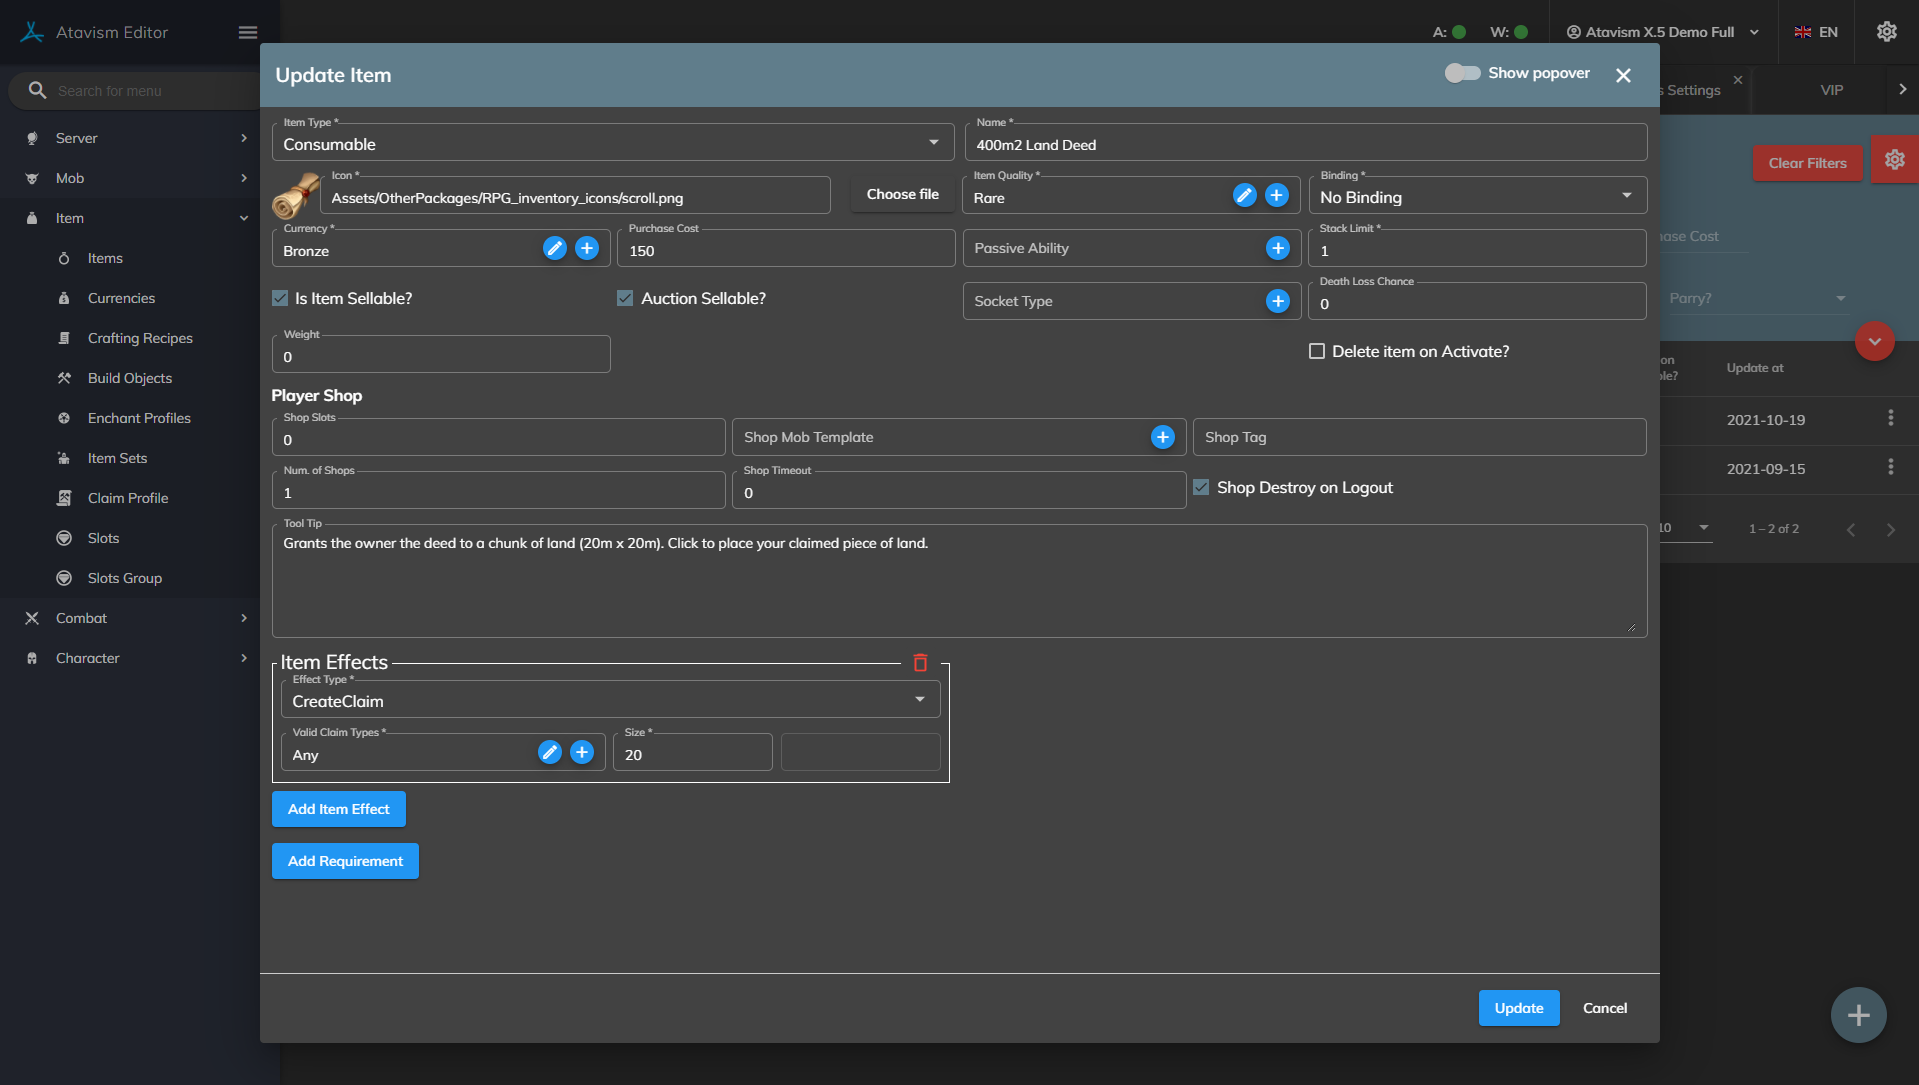
When a player clicks on a Create Claim item it will spawn the Claim where they are standing unless they are too close to an existing Claim. The item will only be removed if the Claim is successfully created.
Building Objects
Players can place down building objects in their claims or other claims they have permission to build in. Objects can be a single place down object such as a chair, or they can be structural building items such as a wall that players can build up over time with resources.
The objects in the claim can be interacted with and keep their state saved to the server, such as a door that can be opened and closed. Other players can also attack objects that have been built up, ruining the appearance of someone’s beautiful creation.
To facilitate the setup of the Build Objects a Plugin has been added to the Atavism Editor.
Setting up a Build Object
Step 1) Creating the Prefab
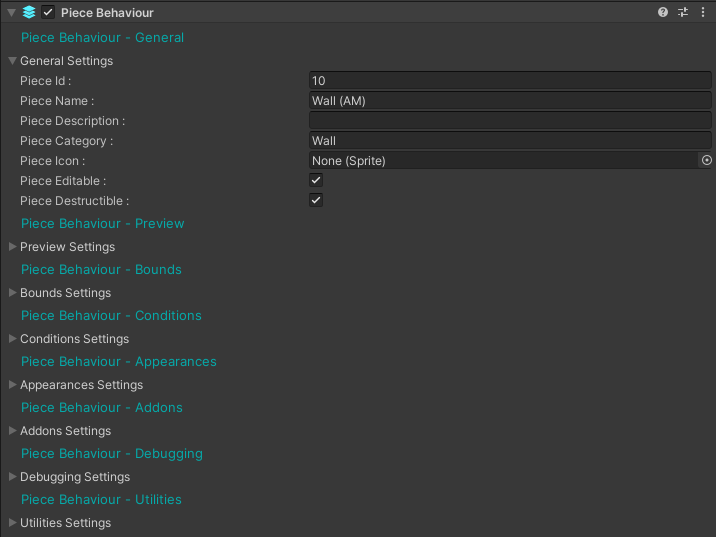
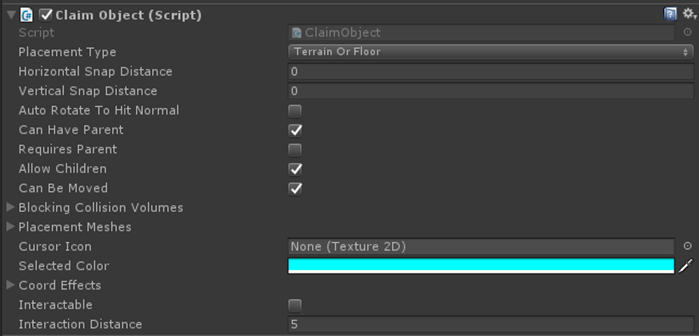
Before a user can have an object to place in the world a prefab needs to be created in Unity. The Prefab will need the ClaimObject component added to it along with a collider either on the object or one of its children so it can detect mouse over and clicks.
The settings on the Claim Object component do not need to be set but can be set to customize behavior.
Example:

The Cursor Icon setting allows you to set what the cursor should look like while the player’s mouse is over the object. The selected color is what color the object should turn when it is selected so the player knows which object is selected. The Coord Effects are the different coordinated effects the object can play when clicked.
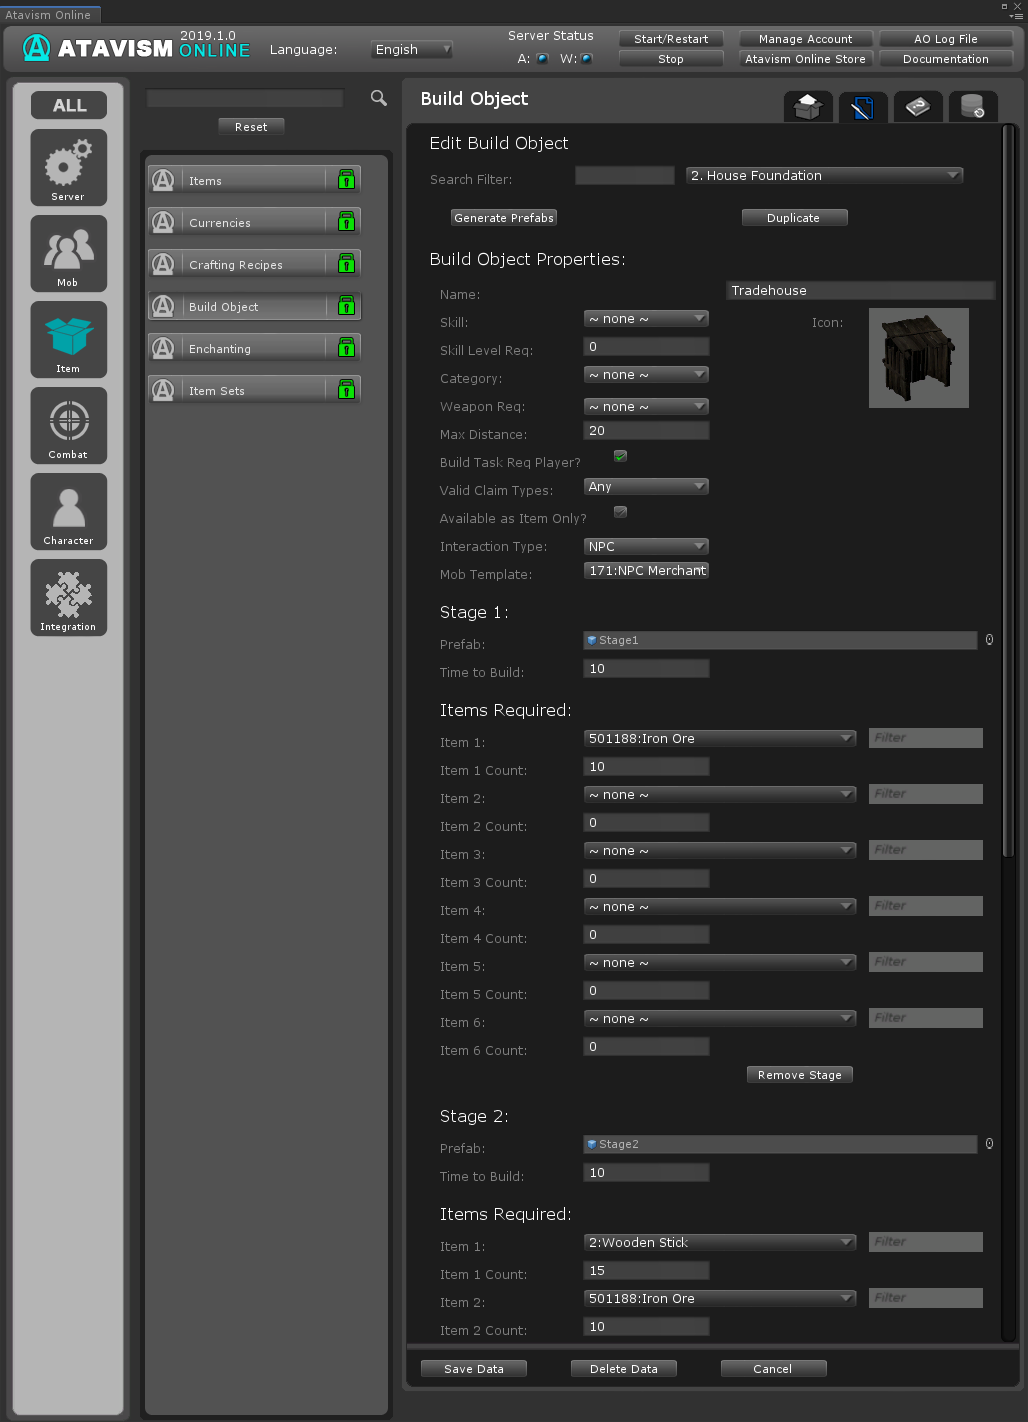
Step 2) Creating the Build Object Template
Once the prefab has been made, go into the Build Object Plugin in the Atavism Editor and create a new template. Set the name and other requirements as needed, then drag the prefab into the Stage 1 Prefab slot along with setting the Items needed to be able to build this object.
Example:
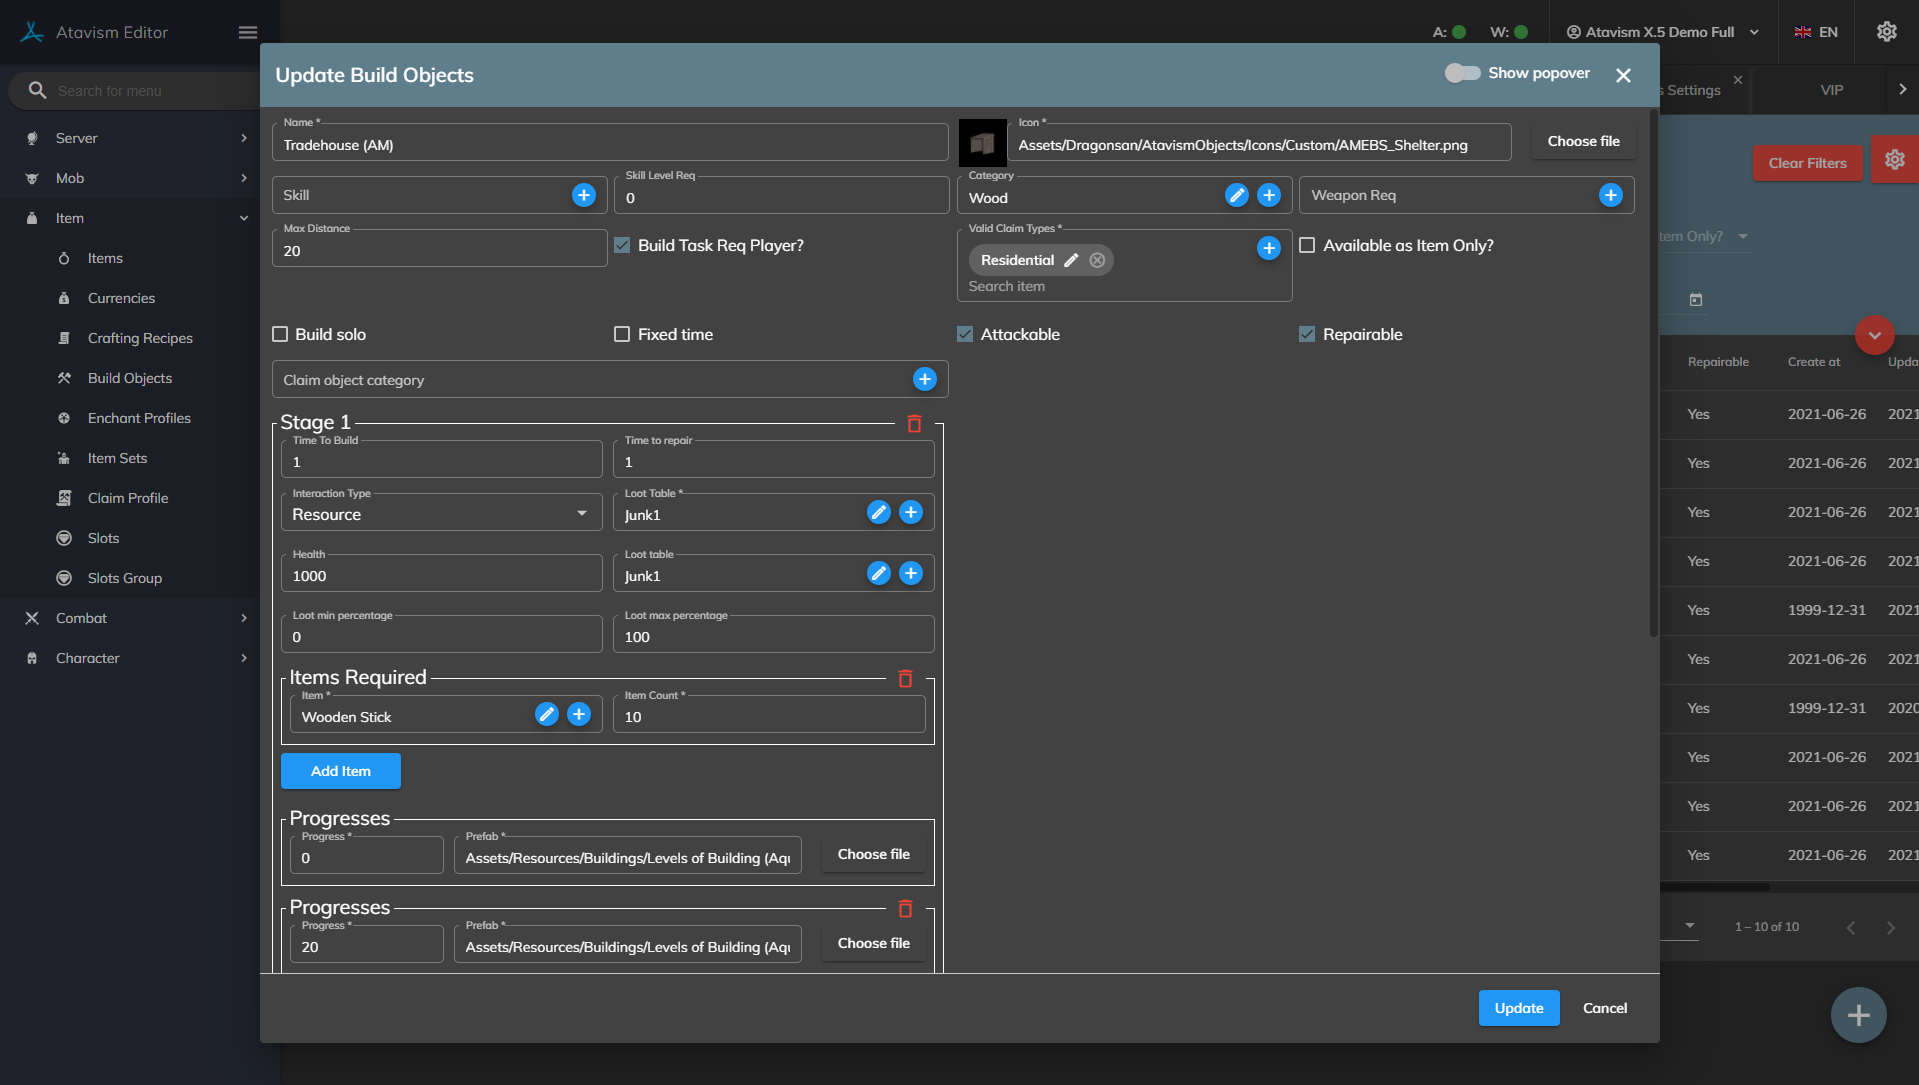
Setting notes:
- You can set a skill and skill level required to build the object along with needing a specific weapon type equipped. If a skill is set the player can skill up from building this object.
- Max Distance is how far away the player can build the object from where they are currently standing. If you want your players to have to stand beside the object they build set it to something low like 2, or if they can place the object anywhere in the claim set it larger such as 20.
- Available as Item Only is used to hide items from the Create Object list in the World Builder UI, meaning they have to click on the item in their Inventory to place the object.
- Drag the Prefab created from Step 1 into the Prefab slot.
- Time to build is how many seconds it takes for the player to build the object. If they move while building it the creation will be canceled.
- Items Required allows you to set up to 6 different materials required to construct this build object.
- Interaction Type, where you can define which interaction will be available once the final stage of the building will be built:
- Chest – where you can define a number of slots, it will behave like a warehouse
- Resource – to behave like a crop on the farm, where you can water some plants to gather the fruits after. This element is configurable in the Loot Table
- NPC – where you can set the mob defined in the Mob Spawn Data plugin, which can be friendly, enemy, can be a trader with special goods, etc.
- Effect – to apply an effect during interaction like a buff
- Instance – to define something like a teleport to another instance, where the player has to build the last stage of some portal to travel to another island or another dimension. Instances are set in the Instance Module
- LeaveInstance – to leave present instance to the previous one
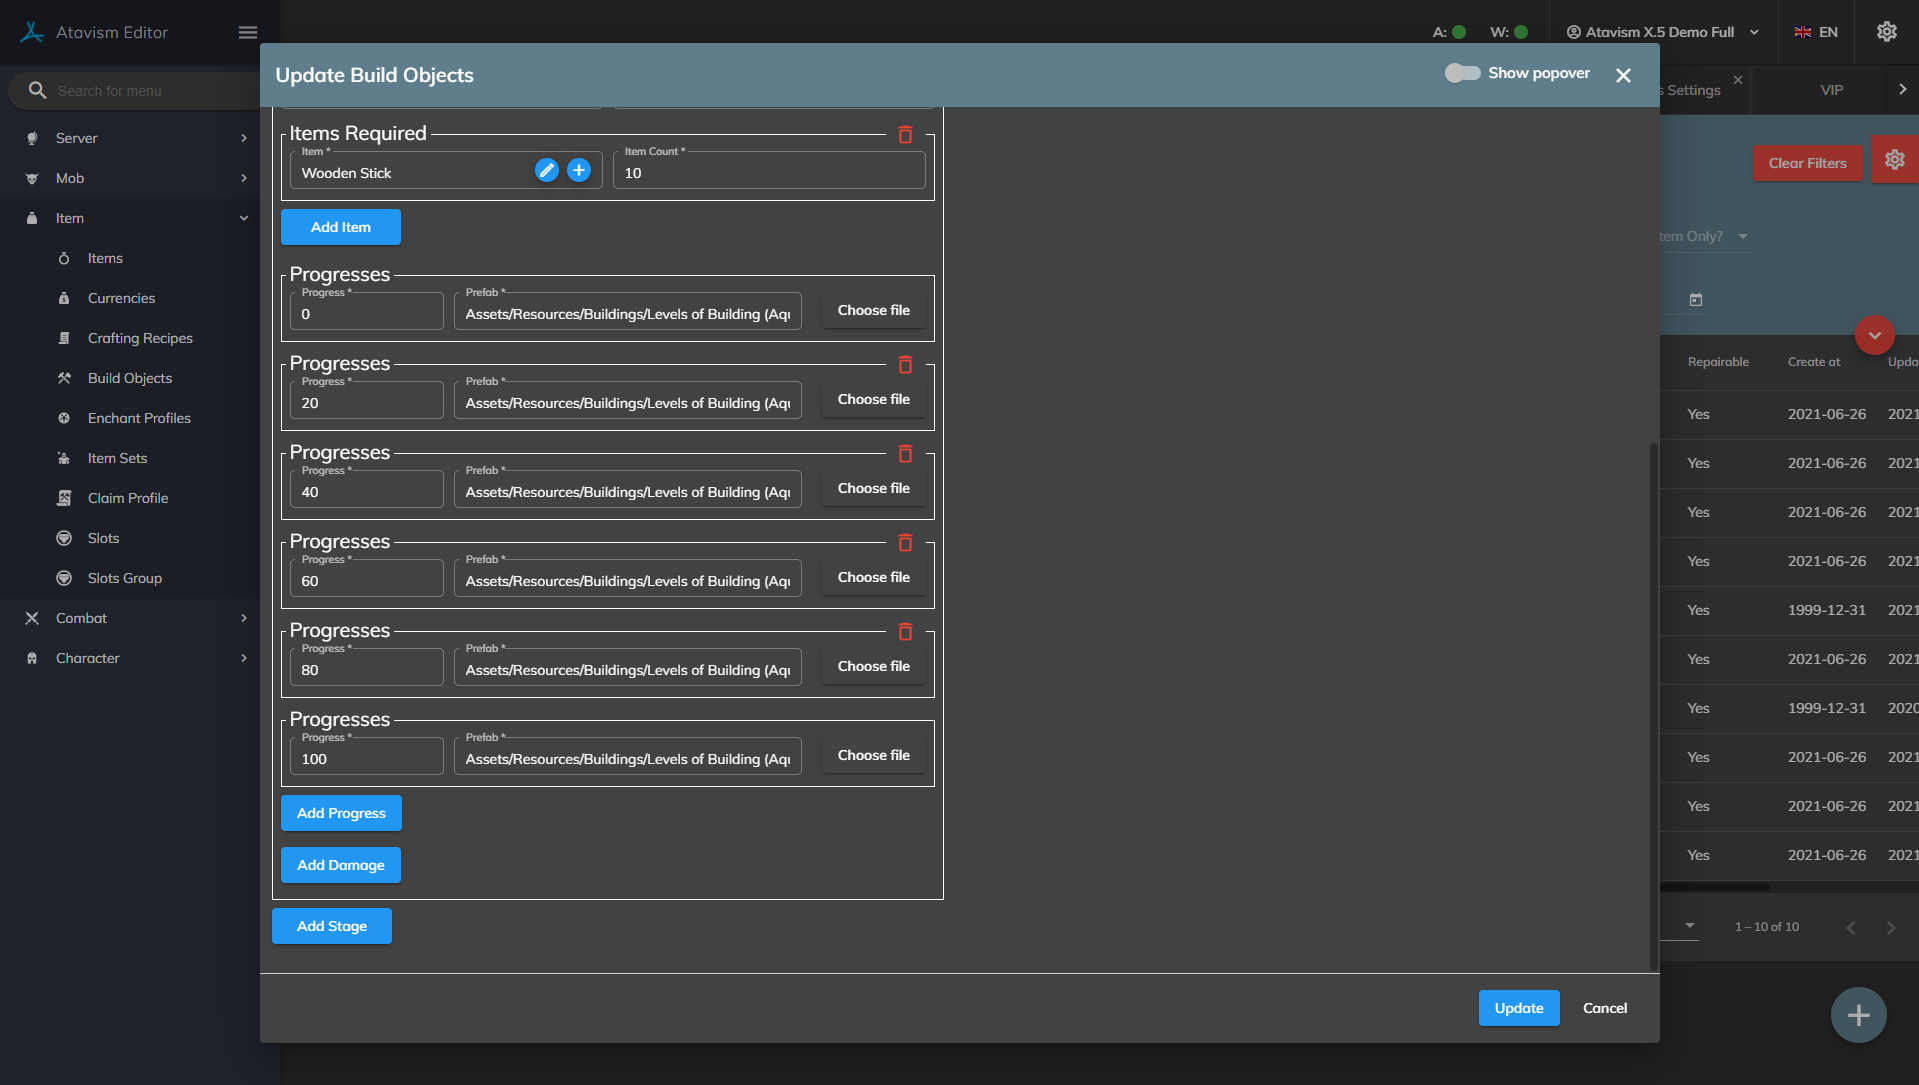
If you want additional stages to your build object (allowing players to build up their object) then click the Add stage and set the new prefab for each stage.
Save the data when done.
Note that the server will need to be restarted before the template will be available to build.
Placing Build Objects in the Claim
From the build menu
Any Build Object Template not marked as “Available as Item Only” will be in the build menu for players when they are in the claim. From the claim menu, click on the “Create Object” button or use the new rotator menu using the “TAB” key, and then click on the object you want to place. The player needs to have the required item for stage 1 as defined in the template.
The model should now show where the cursor is on the screen and allow the player to place down the object. The player must place it within the “Max Distance” setting set on the template. When the player clicks to place the object in the world it will then send the task request to the server and the player will start building the object. The player cannot move while building the object, which will take as long as the “Time to Build” setting is in the template.
Since Atavism X.4 (10.4.0) players can participate in the building process and help others to speed it up. The factor that affects building time is the new statistic “build_stat”, whereby the default 1 point of the stat is 1% of the building speed, 100 is 100%, and the more players will participate in the building process the quicker it will be.
Buildings can be upgraded and provide improved/better interaction type, like a chest with slots which number can be increased when the building will be upgraded.
Buildings can be also damaged, repaired, destroyed, and looted.
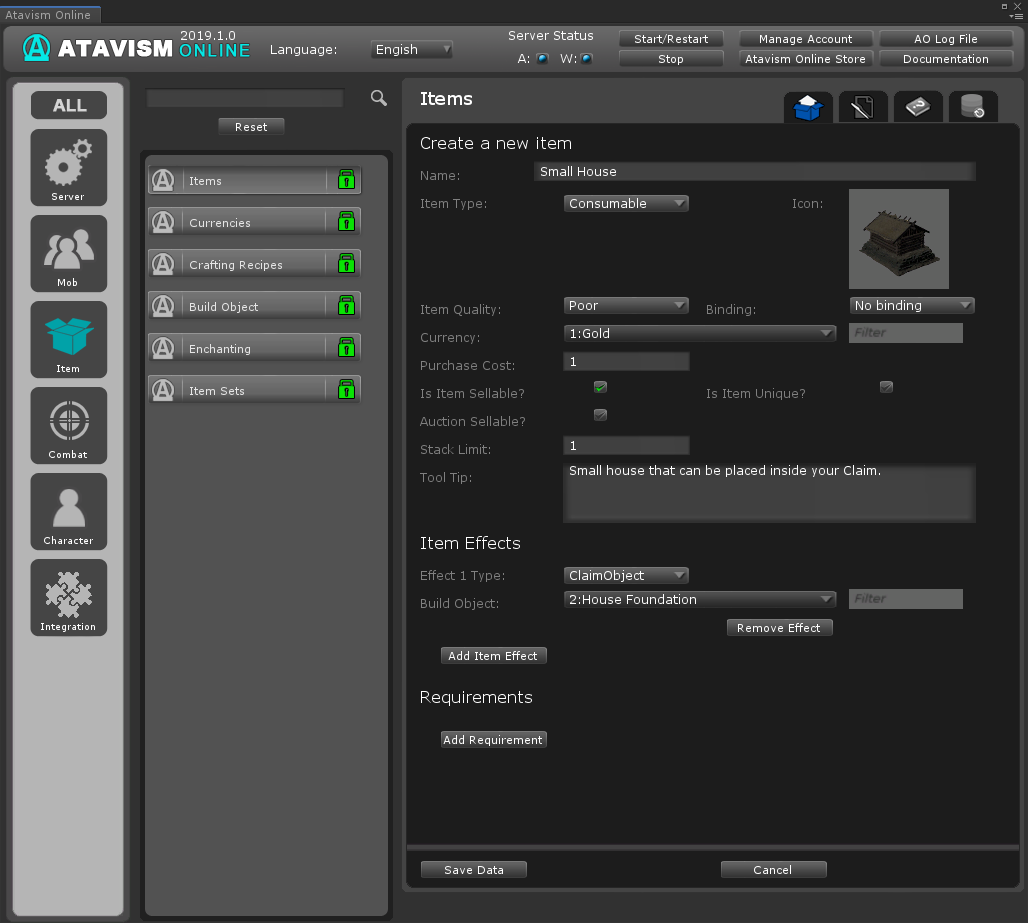
From an Inventory Item
A Claim Object can be linked to an Inventory Item by adding a ClaimObject effect to an item.
Example:
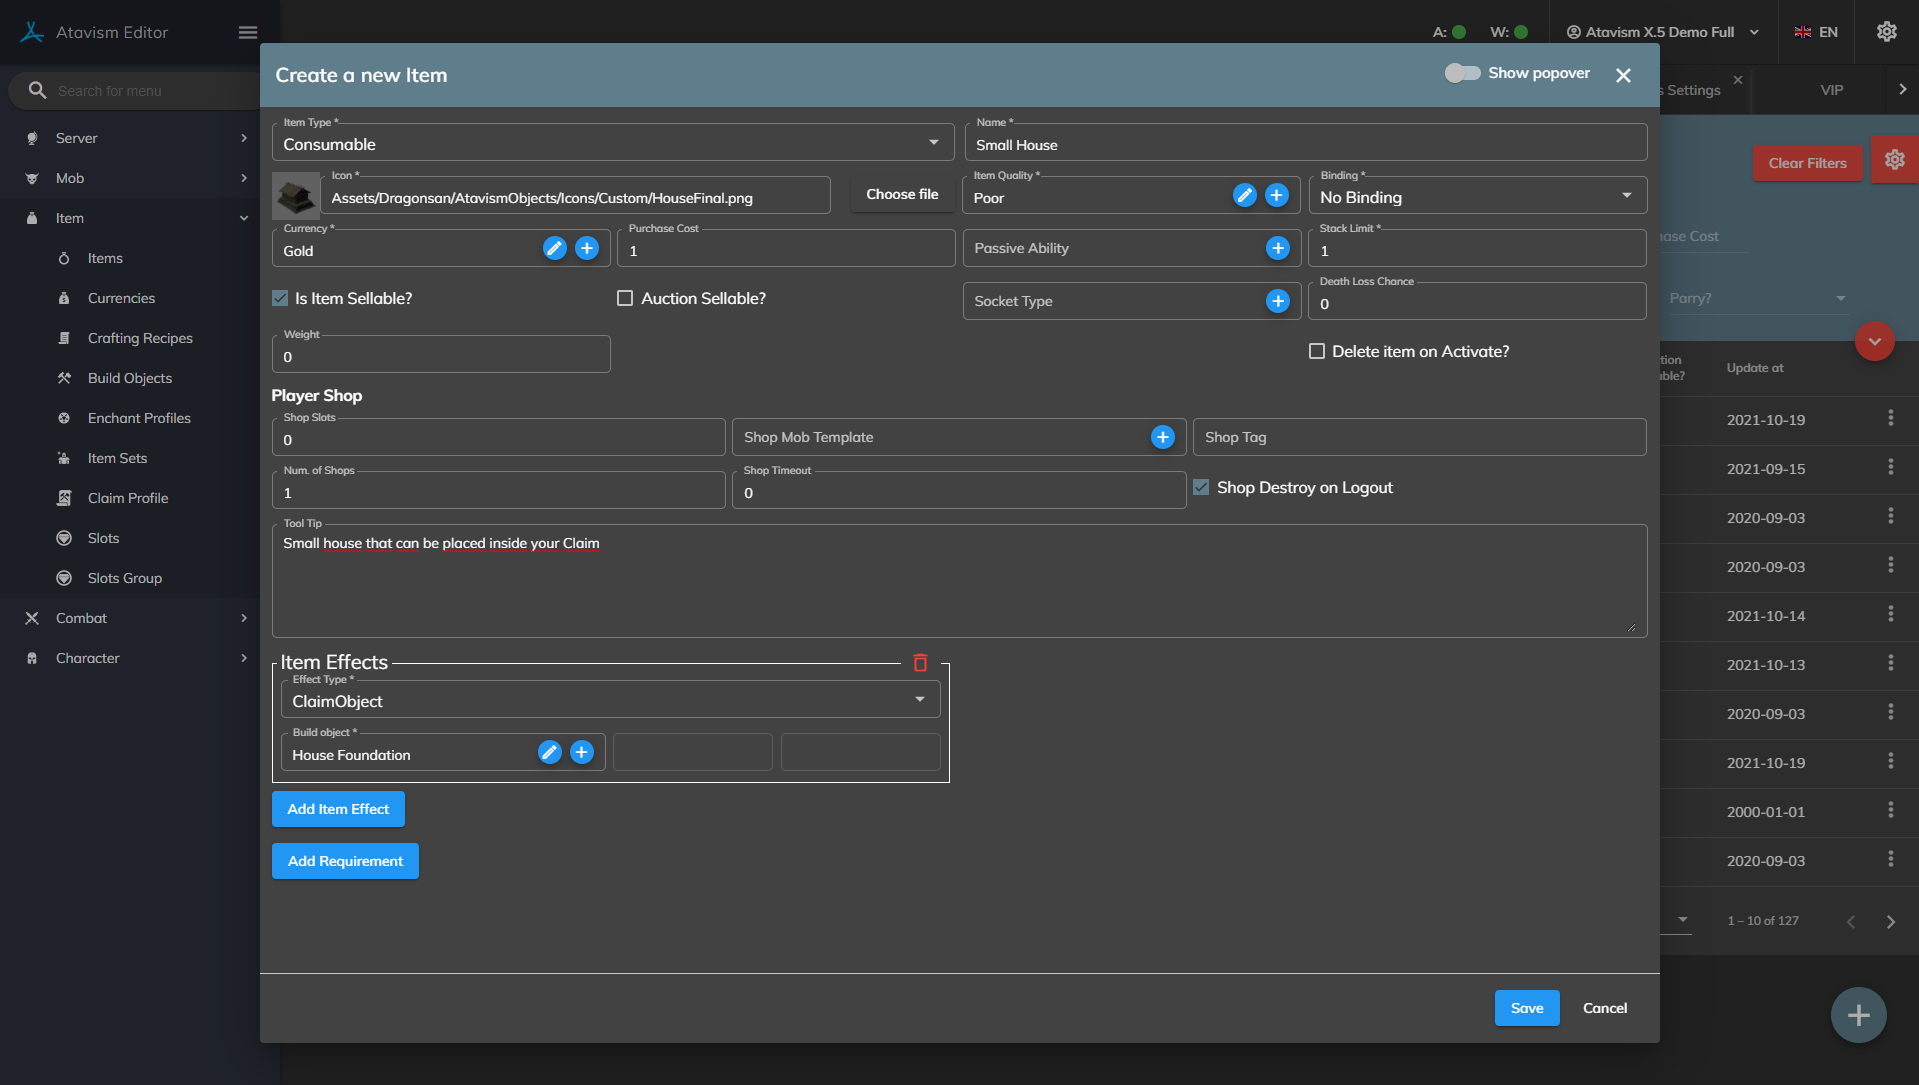
Players can place that item in their Claim by opening up the World Builder UI and clicking on the “Place Item” button. They then click on the item in their Bag and it will display the model by their cursor allowing them to choose where to place it.
It is recommended that Claim Objects as Items do not require other materials or have a build time as it may confuse users, but the option is yours to set it how you like.
Tax System
Claims can be sold by the server or by players. They can have upkeep costs using a tax system where tax can be automatically deducted from the claim owner from the backpack, or it can be manually paid.
Claim Upgrades
Claims can be upgraded and provide more buildings that can be built in it, increase upkeep cost, but also increase its size to let players have more land. In this example entry size is 10x10x10 meter, the purchase cost of this claim is 1 silver, and it’s a claim type of Any type, so there can be built any kind of buildings from any category. Tax for the first level of this claim is 10 silver that will extend the time for 24 hours, it can be paid manually 1 hour before the tax period will be over, and it can be sold when the tax time is higher than 1 hour.
Another level of this claim, so upgraded one has size 15x10x15 meters, the upgrade will cost 10 gold and one Land Deed item with id 501211, the tax will be 12 silver for every 24 hours and t also can be paid manually 1 hour before the tax period will be over, and it can be sold when the tax time is higher than 1 hour., and you can define more such upgrades if necessary.
It’s also worth mentioning that mobs can use world builder objects for pathfinding.
Atavism 10.3.0-

In this plugin you can manage your scene objects (save or delete and set grid size for them) like:
- Interactive Objects: objects with which players will interact with, like portals, apply effects, leave an instance, etc.
- Regions: where you can automatically apply an effect or do any other action when a player will enter the region
- Graveyards: where you can set respawn location instead of normal teleport and spawn location mode
- Claims: designed for building purpose
Manage Interactive Objects
Interactive Objects are set up in the Unity Editor then saved to the Content Database with the Atavism Editor.
Creating Interactive Objects
Interactive Objects are GameObjects that exist in a Unity Scene. Place your Game Object in the scene and add an Interactive Object component.
You can set the properties as follows:
- Interaction Type: defines a type of interaction:
- Apply Effect: you can define Effect which will be applied once Interactive Object will be activated. Such an effect can be defined in Effect Plugin.
- Play Cord Effect: you can define Coordinated Effect which will be played one after another once Interactive Object will be activated. Such coordinated effect can be defined in Coordinate Effects Plugin (you don’t have to create a new entry in Atavism Editor, all you have to do is provide Coordinated Effect object which you should create in /Assets/Resources/Content/CoordinatedEffects directory in your project. On that Coordinated Effect, you should have only Coord Animation Component where you can attach animation, particles or sound with some additional parameters.
More options are described in detail in the Coordinated Effects Plugin. It can be used for example for doors when you will close and open them by interacting with them. Coordinated Effect, in this case, should play the animation (open / close) - Start Quest: start quest which can be defined in Quests Plugin
- Complete Task: complete task which can be defined in Task Plugin
- Instance Portal: defines teleport to the instance with:
- Instance: instance from the dropdown list defined in Instance Plugin
- Position: world position where the player will be teleported in specific Instance
- Min. Level – Max. Level: level range for which that Instance Teleport will be available to, if the player won’t have the level in that range then he won’t be able to enter the instance
- PvP: not available yet
- Sanctuary: not available yet
- Leave Instance: leave instance to the previous one
- Quest Required: defines quest which player must have started to interact with that Interactive Object
- Interact Coord Effect: it’s Coordinated Effect which will be played while interaction with Interactive Object
- Interaction Duration: time of interaction with Interactive Object
- Respawn Time: delay between Interactive Object can be used
- Mouse Over Cursor: defines cursor while hovering over Interactive Object
- Highlight Colour: defines color which will be applied while hovering over Interactive Object
You can add as many Interactive Objects as you want to your scene.
Saving Resources to the database
When you have your Interactive Object added to your scene, open the Atavism Editor and go to the Instance Objects Plugin. Click on Manage Interactive Objects then Save Interactive Objects and wait for the “Nodes Saved” message. Now save your scene again as the Interactive Objects would have been given an id by the database.
Restart your server and go forth interacting those Interactive Objects.
Manage Regions
Regions are set up in the Unity Editor then saved to the Content Database with the Atavism Editor.
Creating the Regions
Regions are GameObjects with colliders that exist in a Unity Scene. Place your Game Object in the scene and add an Atavism Region component. The important thing is to not scale objects but collider only like cube directly on Box Collider Component. Also Collider Component has to have Is Trigger checkbox ticked.
You can set the properties as follows:
- Region Type:
- Water – where gravity won’t be applied and effect can also be applied like lowering oxygen and when it hits min oxygen value another effect can be applied like taking damage which will be applied for each tick.
- Dismount – dismount when entering the region
- Teleport – teleport to the location of x,y,z in same or other instance
- Apply Effect – apply the effect which is defined in Effects Plugin
- Start Quest – start a quest which is defined in Quests Plugin
- Complete Task – complete task for the quest objective
- PvP – change players faction to PvP
- Sanctuary – change players faction to non-PvP. Must be located within the PvP region.
You can add as many Regions as you want to your scene.
Saving Regions to the database
When you have your Regions added to your scene, open the Atavism Editor and go to the Instance Objects Plugin. Click on Manage Regions then Save Regions and wait for the “Nodes Saved” message. Now save your scene again as the Regions would have been given an id by the database.
Restart your server and go forth interacting those Regions.
Manage Graveyards
Graveyards are set up in the Unity Editor then saved to the Content Database with the Atavism Editor.
Creating the Graveyards
Graveyards are GameObjects with colliders that exist in a Unity Scene. Place your Game Object in the scene and add an Atavism Graveyard component.
You can set the Faction requirement for each Graveyard point, so each Faction which is defined in Factions Plugin can have its own Graveyard Spawn Points.
You can add as many Graveyard Points as you want to your scene.
Saving Graveyards to the database
When you have your Graveyards added to your scene, open the Atavism Editor and go to the Instance Objects Plugin. Click on Manage Graveyards then Save Graveyards and wait for the “Nodes Saved” message. Now save your scene again as the Graveyards would have been given an id by the database.
Restart your server.
Graveyards work like spawn points, so if the player will die, then he can release, and then he will be released in the nearest graveyard spawn point location with matched faction requirement.
In order to use that functionality instead of static default spawn point system, you have to have set parameter USE_PLAYER_SET_RESPAWN_LOCATIONS to false in Game Setting Plugin.
Also, the player can use spirit form option instead of release on death, in this case, you can choose effect which will be applied in spirit form by setting parameter SPIRIT_EFFECT to the id of the Effect. The parameter can be defined in the Game Setting Plugin while Effect can be defined in Effects Plugin. While the player is in spirit form he can be revived by Revive Effect which can be applied to him by another player, Region or Interactive Object.
Manage Claims
Claims
Claims are areas of the world that players ‘lay claim to’ allowing them to build in the area. Players may buy and sell claims and place objects freely within their claim and any other claims they have been given permission to build in.
Players can view the claims in the world by opening up the World Builder UI from the rightmost button in the toolbar menu located at the top right of the screen. When they enter a claim they will be shown a UI that gives them options based on their permissions for that claim.
Setting up Claims
Claims can be added to the world in two ways.
- They can be spawned by admin players from the World Builder UI.
- Items with a ‘CreateClaim‘ effect can be used. Make sure the size field is filled in. It is in meters.
Example:

When a player clicks on a Create Claim item it will spawn the Claim where they are standing unless they are too close to an existing Claim. The item will only be removed if the Claim is successfully created.
Building Objects
Players can place down building objects in their claims or other claims they have permission to build in. Objects can be a single place down object such as a chair, or they can be structural building items such as a wall that players can build up over time with resources.
The objects in the claim can be interacted with and keep their state saved to the server, such as a door that can be opened and closed. Other players can also attack objects that have been built up, ruining the appearance of someone’s beautiful creation.
To facilitate the setup of the Build Objects a Plugin has been added to the Atavism Editor.
Setting up a Build Object
Step 1) Creating the Prefab
Before a user can have an object to place in the world a prefab needs to be created in Unity. The Prefab will need the ClaimObject component added to it along with a collider either on the object or one of its children so it can detect mouse over and clicks.
The settings on the Claim Object component do not need to be set but can be set to customize behavior.
Example:
The Cursor Icon setting allows you to set what the cursor should look like while the player’s mouse is over the object. The selected color is what color the object should turn when it is selected so the player knows which object is selected. The Coord Effects are the different coordinated effects the object can play when clicked.
Step 2) Creating the Build Object Template
Once the prefab has been made, go into the Build Object Plugin in the Atavism Editor and create a new template. Set the name and other requirements as needed, then drag the prefab into the Stage 1 Prefab slot along with setting the Items needed to be able to build this object.
Example:
Setting notes:
- You can set a skill and skill level required to build the object along with needing a specific weapon type equipped. If a skill is set the player can skill up from building this object.
- Max Distance is how far away the player can build the object from where they are currently standing. If you want your players to have to stand beside the object they build set it to something low like 2, or if they can place the object anywhere in the claim set it larger such as 20.
- Available as Item Only is used to hide items from the Create Object list in the World Builder UI, meaning they have to click on the item in their Inventory to place the object.
- Drag the Prefab created from Step 1 into the Prefab slot.
- Time to build is how many many seconds it takes for the player to build the object. If they move while building it the creation will be canceled.
- Items Required allows you to set up to 6 different materials required to construct this build object.
- Interaction Type, where you can define which interaction will be available once the final stage of the building will be built:
- Chest – where you can define a number of slots, it will behave like a warehouse
- Resource – to behave like a crop on the farm, where you can water some plants to gather the fruits after
- NPC – where you can set the mob defined in the Mob Spawn Data plugin, which can be friendly, enemy, can be a trader with special goods, etc.
- Effect – to apply an effect during interaction like a buff
- Instance – to define something like a teleport to another instance, where the player has to build the last stage of some portal to travel to another island or another dimension
- LeaveInstance – to leave present instance to the previous one
If you want additional stages to your build object (allowing players to build up their object) then click the Add stage and set the new prefab for each stage.
Save the data when done.
Note that the server will need to be restarted before the template will be available to build.
Placing Build Objects in the Claim
From the build menu
Any Build Object Template not marked as “Available as Item Only” will be in the build menu for players when they are in the claim. From the claim menu click on the “Create Object” button and then click on the object you want to place. The player needs to have the required item for stage 1 as defined in the template.
The model should now show where the cursor is on the screen and allow the player to place down the object. The player must place it within the “Max Distance” setting set on the template. When the player clicks to place the object in the world it will then send the task request to the server and the player will start building the object. The player cannot move while building the object, which will take as long as the “Time to Build” setting is in the template.
From an Inventory Item
A Claim Object can be linked to an Inventory Item by adding a ClaimObject effect to an item.
Example:
Players can place that item in their Claim by opening up the World Builder UI and clicking on the “Place Item” button. They then click on the item in their Bag and it will display the model by their cursor allowing them to choose where to place it.
It is recommended that Claim Objects as Items do not require other materials or have a build time as it may confuse users, but the option is yours to set it how you like.